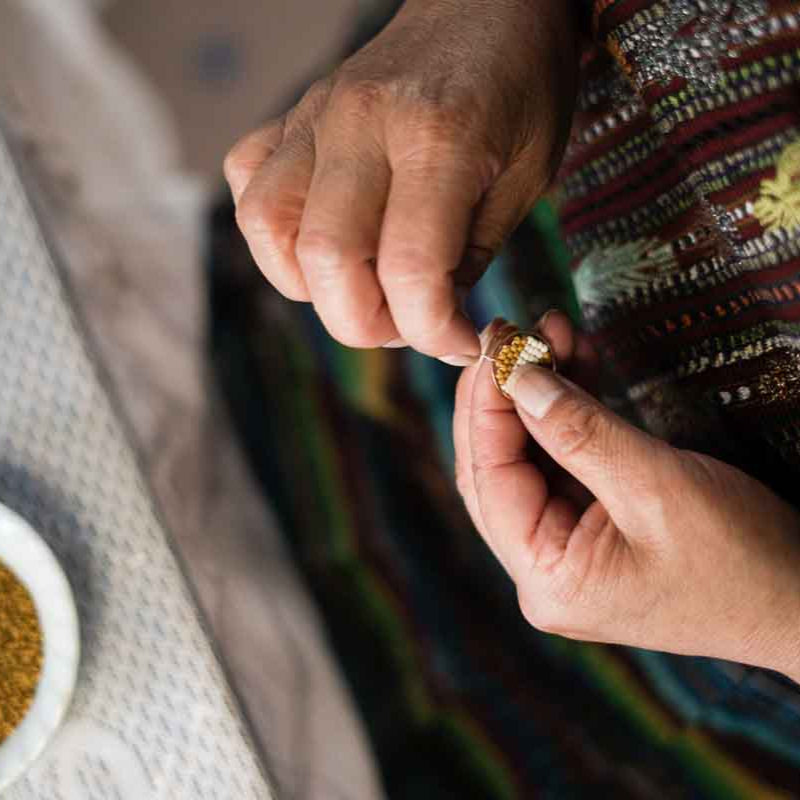
This simple shift dress pattern was created in 2017 to raise money and awareness for Dressember. Women wear dresses for the month of December and people sponsor them. The money raised goes to fight human trafficking. Since the garment industry is such a huge contributor to the exploitation of women and children, this fits really well. A person is behind every seam of the clothes we wear, and it's usually a woman. Our care in purchasing clothes responsibly is a way to show that we value that person. It's bigger than a dress. Garment workers should not suffer because our market has driven down the price of a tee shirt to the cost of a latte. Making a piece of clothing shows just how much work goes into it.
We'd love to see what you make @fairandsimple! #madebywomenpatterns
Print the Pattern
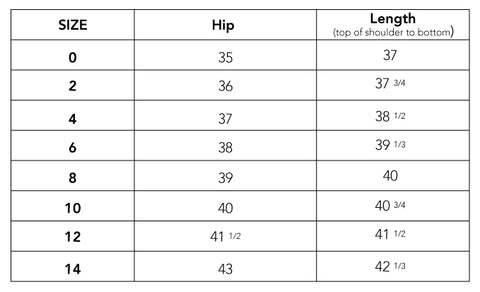
SIZE 0 | SIZE 2 | SIZE 4 | SIZE 6 | SIZE 8 | SIZE 10 | SIZE 12 | SIZE 14 | Size 16
The pattern and tutorial are free, and we are asking for a suggested $5 donation to Dressember if you use the pattern for personal use. Please enter "Fair + Simple Dressember Dress Pattern" in the comments.
You will need 2 1/2 yd of preshrunk fabric with a 60" selvage. I highly recommend European linen for this pattern. (Sizes 0-4 can get away with half of the yardage if Pattern Piece A fits between width of the fabric once it is pre-shrunk. Size 16 will need just a few inches over 2.5 yds unless you shorten it )
This dress is designed with a 3-4” ease at the hips. It's really loose and versatile, so you can wear it alone with a long necklace with ankle booties, with a belt and a cardigan, or half tucked with jeans as a shirt.
Pictured with our pocketed half apron
*Be sure to use PRE-WASHED and pressed fabric.
1. Place inner edge of pattern A on a fold and cut out the back of the dress
2. Cut out the dotted part of the neckline. Place edge of pattern A on a fold and cut out the front of the dress
3. Place upper edge of pattern B on fold and cut twice to make both of your sleeve caps. (I recommend cutting this on the bias)
1. Place front of dress on back of dress, wrong sides together. Sew 3/8” seam on shoulders and side seams.
2. Carefully trim to 1/8”. Press seam to back.
3. Turn inside out. Sew shoulders and side seams at 1/4”, enclosing the first seam.

4. Press shoulder seam to back. Sew along edge. This will flatten the shoulder seam so it lays nicely.

1. Finish the short ends of the sleeve cap with a zig zag stitch or serger to prevent fraying. Sew short ends of sleeve cap with a 3/8” seam, right sides together. This will make a loop. Press seam to one side and turn loop right side out.
2. Fold the sleeve cap loop, enclosing seam. Press. Finish edge with a zig zag seam or serge.
3. With the dress right side out, finish the armscye with a zig zag stitch or serge. Line up edge of sleeve cap on the outside of the armhole. Also line up seams of loop with side seam of dress so that these seams are hidden in the armpit. Sew at 3/8" seam allowance.
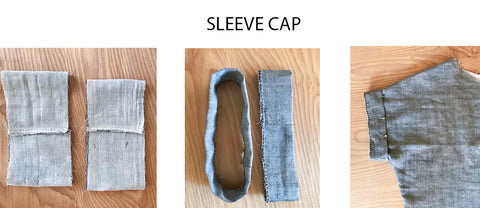
4. Press the seam allowance toward the sleeve cap which will help it lay flat.
The sleeve caps are my favorite part.
I'm just going to say it - this is the worst part. But you will feel so legit when it's done.
Also, try not to tug or pull or stretch the fabric during this part. Don't screw this up!
1. Cut strip on the bias that is 1" wide and around 26" in length. I usually use a fabric marker and a clear ruler. In order to preserve fabric, you can combine two short pieces together at a diagonal.

Cutting on the bias means cutting the fabric on a diagonal. It makes the bias tape really stretchy so it will lay nicely. Don't be a slacker and use a straight strip. It won't be as good.
2. Fold and iron 1/4" of both long sides of bias tape to make double folded bias tape. Or, use a bias tape maker (so good).

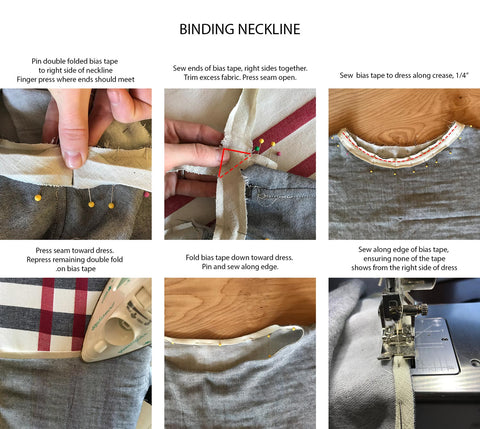
3. Unfold one edge of bias tape and pin right side of bias tape on right side of neckline. This won't be visible when the dress is finished, but still make sure your seams are not on the front for dress. Form a loop with the bias tape.
4. Finger press the ends where they meet. These finger pressed edges will be the triangle in the image above of combining bias tape. Use a fabric marker to draw your line. Sew with right sides together. Trim excess fabric. Press seam open.
5. Sew binding to dress with 1/4" seam allowance, following the crease of the bias tape. Trim down a touch. Carefully clip notches around the curves.
6. Press seam toward dress with binding away from the dress. Repress the remaining fold on the bias tape while you are at it, if necessary.
7. Fold bias tape down toward dress, ensuring that it is all hidden from the right side of the dress. Pin.
8. Sew along the edge of the binding.
Image shows steps 4-8
Press 1/4" under at the bottom hem. Then press another 1/2" under. Top stitch with a twin needle or two parallel stitches. The dress in the pattern is a straight hem, but you can easily make it a curved or hi-low hem if you feel like it!

You're Finished!
A finished dress was used in the most beautiful editorial photoshoot by Betsy Blue Photography with Ryan Moon. A very special thank you to her for the photos of the finished dress. And for just being Betsy.